Why microgreens?
For consumers, microgreens offer a chance to pack nutrition and flavor into a variety of dishes. The crop can taste fresh, sweet, buttery, or spicy depending on the type grown. Chefs and cooks across the world are discovering amazing uses for these tiny greens.
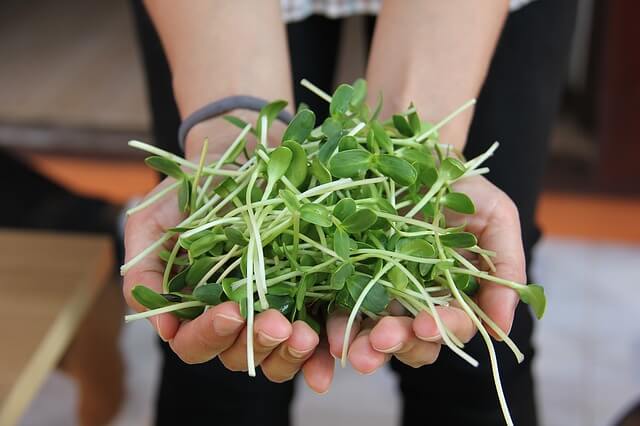 For chefs, microgreens can serve as the spotlight of a dish or as a sidekick of flavor. They can add color and interest, and are a great medium to work with.
For farmers, microgreens offer low costs and can return high profits (depending on the market). Though the risk of overwhelming the market exists, the quick turn-around crop and the ease of growing have made it popular as an alternative revenue stream.
(Experts recommend dedicating no more than 20% of your operation to microgreens production.)
We recently published a quick growing guide on microgreens, courtesy of microgreens grower Kevin Espiritu at Epic Gardening. (Check out Kevin’s guide here.)
If you’re already growing microgreens, you’ve got the basics down and are ready to fine-tune your operation. This winter we’ve been conducting microgreen trials here at the Bright Agrotech farm to discover best growing conditions and equipment. Taylor Wollert, head of those trials, has put together several tips for microgreen growers.
1) A propagator is worth the investment
Our trials found that seeds germinated best at about 75 ℉ and when kept consistently moist. We found that tools like irrigation- and light-timers and seedling carts with automatically run flood trays helped us maintain consistent conditions for the microgreens.
Of these, the tool that offered the greatest return was our propagator. A propagator is an enclosed chamber (ours is about the size of a refrigerator) with a heating element and water under the bottom shelf. The inside of the chamber maintains high humidity and a set temperature, which comes in handy when you’re growing seedlings.
Our trials showed a significant increase in microgreen yield when we used a propagator over other less-controlled methods to germinate seeds:
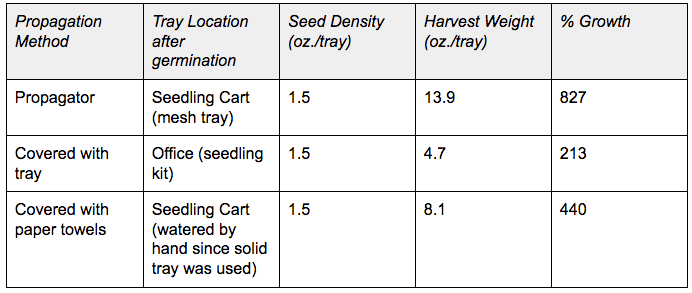
To be clear, these numbers compare one set of microgreens that was both germinated and grown in the seedling cart to another set of microgreens germinated in the propagator and grown in the seedling cart. (Stay tuned for more in-depth data on microgreen media and crop types!)
If the propagator is too high an investment for your microgreen operation, then you can still improve consistency by using heat mats and by trapping humidity near the seeds with tray covers or paper towels. These methods aren’t as effective as the propagation chamber but do increase total yield per tray.
2) Give your microgreens proper drainage
While moisture is key to good growth, standing water decreases oxygen around the microgreen roots and can encourage fungal and algal issues. For growers using a seedling cart, a mesh bottom tray allows water to leave the tray while timed irrigation keeps the growing mat damp.
If you’re growing microgreens without the cart, use a solid bottom tray but take care not to overwater the seedlings. Consistency without a seedling cart is more difficult, but vigilant checking can compensate for a lot!
3) A higher relative humidity results in crisper greens
Low relative humidity (20–30% RH ambient) resulted in microgreens that were softer to the touch than those grown in higher (50%) relative humidity. At higher humidity, the microgreens of the same crop were crisper and fresher tasting than those grown at lower humidity.
Remember that humidity is generally a bad thing in a farm, and you should have an HVAC system that helps negate humidity. This means that to increase humidity for microgreens, you should grow them in an enclosed space. This is another instance where a propagator and a seedling cart come in handy. The propagator is enclosed, and a plastic sheet can be used to enclose a seedling cart.
4) Prevent mold and fungus issues proactively
Fungus is one of the greatest enemies to microgreen growers. It is usually triggered by too high moisture in the growing media or trapped humidity combined with heat. Taylor Wollert, who ran the microgreen trials in the Bright Agrotech farm, recommends several proactive measures to avoid this type of growth.
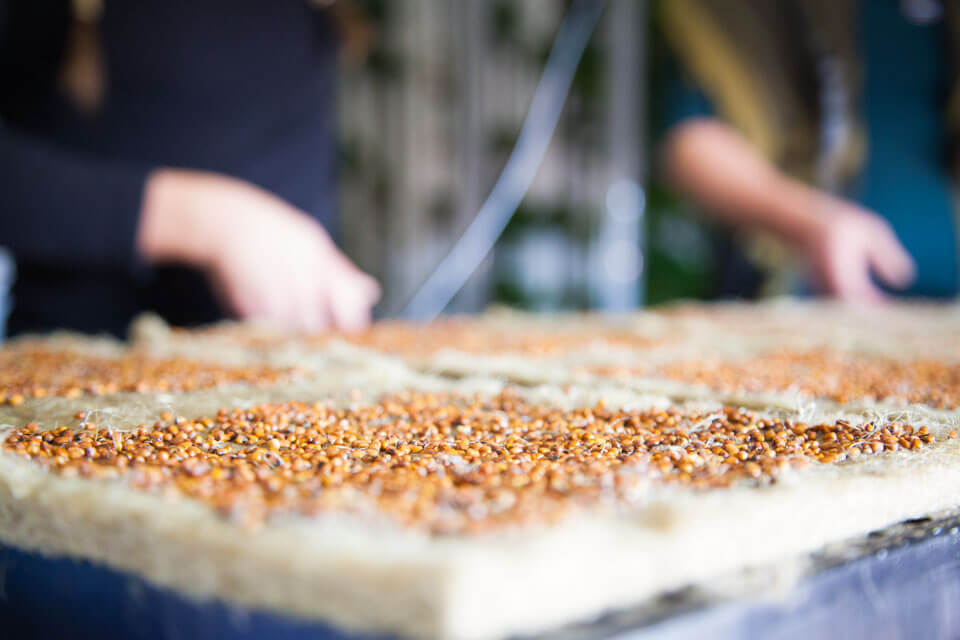
“To avoid mold growth be sure seeds are not bunched together tightly on growth media and spread seeds as evenly in a single layer as possible.”
If fungal issues still occur, you can combat them by spraying with a diluted hydrogen peroxide solution (~1 tsp hydrogen peroxide per gal water).
5) Use the proper seed density
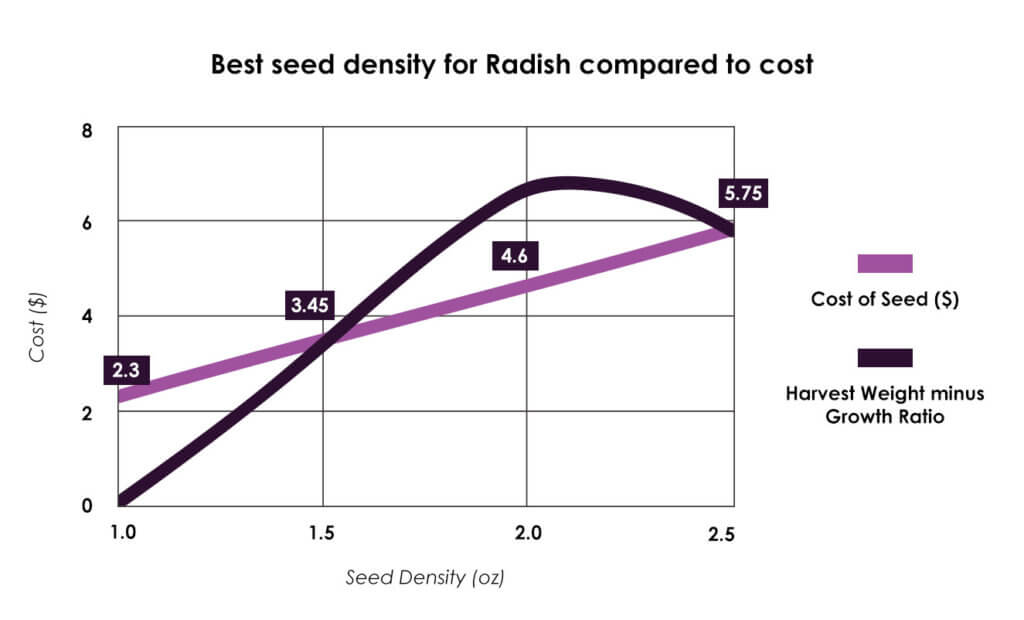
Different microgreen crops require different seed densities. For instance, radish seeds are the most economic when planted at 1.5–2.0 oz. per 10×20 inch flat.
Other crops like arugula should use different densities. Arugula has a smaller seed, so plant density will be higher at the same seed density. As a general rule, the larger the seed, the higher planting density will need to be.
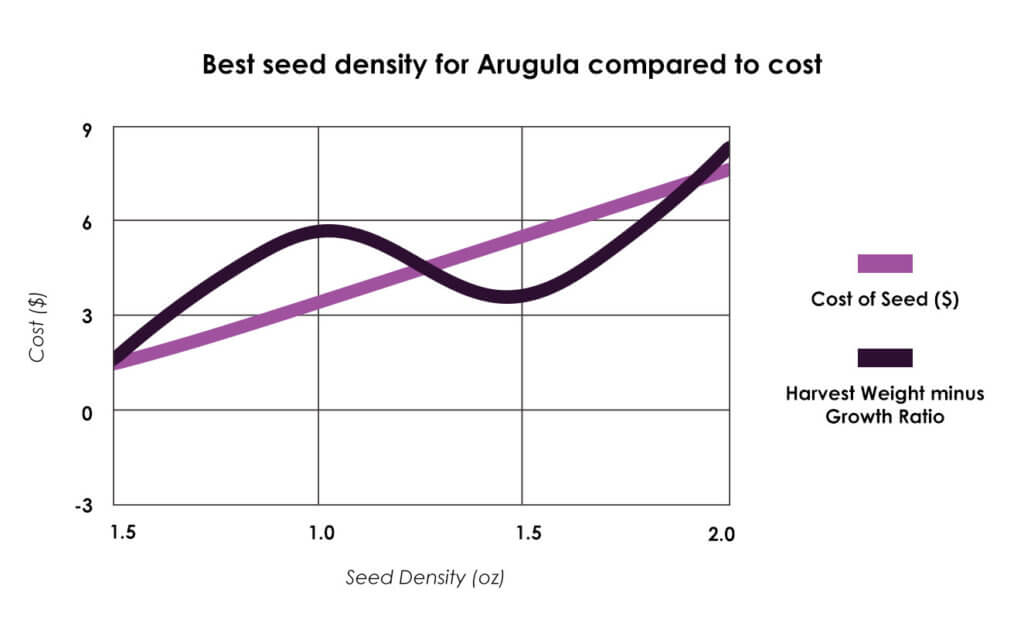
When seeds are planted too densely, water flow and drainage can become an issue. Heat and humidity get trapped inside the plant canopy more easily. This difference can cause fungal issues.
6) Streamline your process with the right equipment
Although the costs of a microgreen operation are generally quite low, labor is a variable cost that can eat up your profits if not planned well. Growers should record labor times whenever they begin and change their growing process. Streamline planting, care, and harvesting as much as possible.
During the Bright Agrotech microgreen trials, harvesting was one of the most time-intensive parts of labor. Harvest can be sped up by keeping blades sharp and using equipment like small hedge trimmers to harvest.
An additional benefit of sharp blades is that a clean cut improves shelf life.
Some growers have bypassed the harvesting labor completely by eliminating it and delivering their microgreens live.
Conclusion
One of the greatest benefits of microgreens is that they are easy to start as an experiment and scale from there. New growers can begin with a few trays of microgreens on a shelf and use them as samples to test out demand in their market.
If they find demand and like growing them, farmers can easily scale their microgreens production. This makes microgreens a great fit as an alternate revenue stream or value-added product.
Ready to start your own trials?
Get started testing your markets with a simple microgreen operation:
Download the Microgreens Quick Guide now and keep it on hand for reference!



I’m not clear on the seed cart procedure. Do I dunk the seed tray in water once a day, then cover with paper towel until germination, then run normally with the seed cart?
Hey Emilio, it depends on your setup. If you’re running a propagation chamber and flood trays, an initial dunk of the media should be fine until the seeds germinate. Then, the seed cart will water the trays. Only cover the germinating seeds with a paper towel if you don’t have a humid chamber like a prop chamber.
Hello, can you clarify for the propagator. How much time should it be kept in the propagator.
ALso, what is the level of moisture requires to ensure proper germination in the propagator.
Hi Rishi, keep your seeds in the propagator until they are germinated. Germination times vary by crop, but the seeds will come with a time range.
good day. What should be the temperature and humidity for microgreens. When the growth has already sprouted?
Alexandr—
We have several great resources for microgreens including an additional article, “How to Grow Microgreens: The Beginner’s Guide“, and the Growing & Selling Microgreens course.
How long should a light day after germination. How to calculate the water volume by the number of plants?
Hi, What strength hydrogen peroxide do you use ? 3% ?
Hi Jan!
Thanks for your question! Yes, the hydrogen peroxide strength is 3%.
1 tsp of 3% hydrogen peroxide in a gallon of water will not do anything to combat mold. You need food grade hydrogen peroxide which is 35%. Handle with care.
It is also important to read all of the information provided with the food grad 35% peroxide, as Nigel stated above. This is an aggressive oxidizing chemical that can cause skin irritation and lung irritation. Please take this chemical seriously as this is not your normal household peroxide.
No. “Food Grade” does not mean 35%. It means it doesn’t contain impurities. You can buy 3% food grade H2O2 *and* 35% food grade H2O2, as well as many other concentrations.
When I search “propagator”,I see a lot of boxes with clear domes/lids ? And the use of such device is beyond just germination. I could probably build what you describe, but I’m not sure what it is. The temperature part is strait forward, but not sure about the humidity?
Does it maintain humidity by virtue of the filled try or are there misters or something to move water.
Your article is quite informative and can help anyone grow up micro greens on their own. I belong to a small village, but my profession and career concerns pulled me to the urban area and put me into a lifestyle full of stress, I got everything but paid a price for it – health issues like constipation, poor eye sights, wrinkles, and so on. Every time I contact my physician, I get nothing but pills to compensate lack of vitamin B , C, and E, which several research and experts like this https://www.bloominggreens.com/ say can be easily obtained from micro greens. With your suggestions, I think I must give it a try.
We have rust on sunflower microgreen. It’s look awful. Help me please!
Anna—
Sounds like something fungal. We’d recommend the diluted peroxide we put in the microgreens guide to sterilize seeds and media before planting.
It is recommended that you use food grade hydrogen peroxide, which is usually around 30%.
I tried beet micro greens. But they didn’t germinated. Should they soak early? can you guess the problem?
Asiri—
Beets can be soaked for up to 24 hours prior to germination. Most varieties prefer 55-75 degrees and can take 5-10 days to germinate (or longer, if using the colder temperatures).
Amy Storey and Mia Lauenroth,
Can you please clarify how you calculated the “Growth Ratio”? What were your actual yields/harvest weight per tray for the microgreens grown at these densities? How did you create the curve using “Harvest weight minus Growth Ratio”?
I am currently writing a scientific article on the seed density of microgreens. Your specific may help me to cite more details of your research for comparison. Thank you for your time.
Hello, I did not understand the graph on cost in relation to seed density. What would be the darkest line, weight harvested minus growth rate?
Hi felipe,
It is the relationship between seed density and the harvest weight. As you can see, as the seed density gets higher, the harvest weight also increases until a density of about 2.1 oz. At that point, the line curves back downward, indicating that above 2.1 oz, higher seed density no longer leads to higher harvest weight.
thanks!!
Great information about growing microgreens. It will help a beginner to get tips in growing microgreens with the best possible ways. Keep sharing!!
Hi !
What was the arugula average yield on the graph? Please
Thomas